Showing posts with label automation. Show all posts

Thursday, July 19, 2012

Selenium 2 Java client: How to resolve apostrophes problem in xPath

It's pretty much common problem how to handle apostrophes if you have to use them in attribute values or any text which you somehow  use to narrow the search scope.

Assume we need to find the element having name attribute containing pattern "Someone's". Like

<file name="Someone's name"/>

The obvious way is to use the xPath like this: //file[contains(@name,'Someone's')]. However such the xPath won't be parsed properly as we've just broken the language syntax by placing three sequential single-quotes.

The good approach to resolve such the problem is to use the concat construction so that the example above will look like this:

//file[contains(@name,concat('Someone',"'",'s'))]

Here we split the string by three parts and enclosed the single-quote with double-quotes. This is the good solution, however we still need the approach to build such the constructions whatever the number of single-quotes have the place and whatever combination with regular text they have as well

Fortunately Java provides convenient facility to work with the strings and here I suggest the function helping to handle such the problem in your Selenium scenario.

 String resolveAprostophes(String item){
  if(!item.contains("'")){
   return "'" + item + "'";
  }
  StringBuilder finalString = new StringBuilder();
  finalString.append("concat('");
  finalString.append(item.replace("'", "',\"'\",'"));
  finalString.append("')");
  return finalString.toString();
 }
So you can use it in such the way:

String safeXPathToLocateTheElement = "//file[contains(@name," + resolveAprostophes("Someone's") + ")]";

And then use it in your regular look-up patterns

How to make JMeter to execute certain sampler in certain thread

One day I needed to develop JMeter scenario so that it could execute certain samplers in certain threads and choose the order of sequential sampler execution according to certain algorithm. Random Controller was not an option as it actually does not guarantee that the next thread will run another sampler.

Searching the solution led me to JMeter component reference page where they say that  such the cases should be handled with so called Interleave Controller. However due to some reasone that silution didn't work for me. Probaly I couldn apply that emoponent properly, anyway I used another approach.

1. Add a counter to your thread group so that it will store the numbr of sequential running thread in dedicated property (ex. cntr)
2. Group the set of samplers you'd like to choose from with Switch Controller
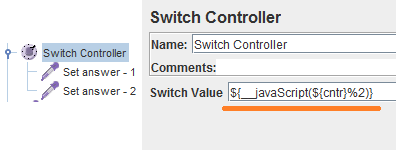
3. Using javaScript expression specify the condition for "Switch Value" field like it is shown on the picture below
Example of Switch controller and javascript mod (%) operator
This approach actually means that each time the new thread gets started the sequential number is generated by the conter. That value is stored in cntr property. Then the execution flow gets into Switch Controller. It evaluates the number of the item to be executed this time. Evealuation is performed with the help of javascript mod operator. Thus in above example we have two alternatives to choose from so we must get the reminder after devision current thread number by two. If we have N alternatives to choose from we must specify the following   condition:

${__javaScript(${cntr}%N)}

That's it

Thursday, July 05, 2012

How To Dump File Structure To XML. Part 3 (Final Part)

In Part1 we learned how to operate with XSD schemas and design you XML-based DSL. Then in Part 2 we learned how to build the parser and apply the business logic to owr application. We made our application capable to store the file structure in XML file.

Now we need the oposite operation. We need to restore file structure from XML file. Remember that that's only a structure, not the content, so every file will not hold a byte of information, just a name (aka record in file system).

Validating XML file with XSD schema


So, check this snippet:

public class XMLToFS {

 public static void reproduce(String sourceFile) throws SAXException, IOException, JAXBException{
  JAXBContext context = JAXBContext.newInstance(XTFSFolderRoot.class);
  Unmarshaller reader = context.createUnmarshaller();
  File schemaFile = new File("conf/fstoxml.xsd");
  File sampleFile = new File(sourceFile);
  validateAgainstSchema(schemaFile, sampleFile);
  XTFSFolderRoot rootNode = (XTFSFolderRoot) reader.unmarshal(sampleFile);
  long startTime = System.currentTimeMillis();
  new FSCreator(rootNode).create();
  System.out.println("Finished in " + String.valueOf(System.currentTimeMillis() - startTime) + " milliseconds");
  
 }

 static void validateAgainstSchema(File schema, File targetXml) throws SAXException, IOException{
  SchemaFactory schemaFactory = SchemaFactory.newInstance(XMLConstants.W3C_XML_SCHEMA_NS_URI);
  Schema referenceSchema = schemaFactory.newSchema(schema);
  Validator schemaValidator = referenceSchema.newValidator();
  schemaValidator.validate(new StreamSource(targetXml));
  System.out.println("Xml file conforms specified schema.");
 }
}

XML recursive going round

This is the main acting class to reproduce the file system from an XML file. It requires the schema designed in previous posts to parse the input content genereated by previousely described functionality. This snippet is also the example of how to validate xml file against xsd schema. As it is seen it's quite simple - just use the pattern.
After we have validated our input data, we should process the data to get the file structure. First we should create the root object from the data from file (aka unmarshall) - see line #9. Once we have the object we can pass it to the dedicated code to reporoduce the structure as the set of files on your hard drive. Such the functioality I incapsulated in FSCreator class. Here it is:


public class FSCreator {

 XTFSFolderRoot rootNode;
 
 public FSCreator(XTFSFolderRoot rootNode){
  this.rootNode = rootNode;
 }
 
 public void create() throws IOException{
  File rootFolder = new File(rootNode.getPath());
  if(!rootFolder.isDirectory()){
   boolean isSuccess = rootFolder.mkdir();
   if(!isSuccess){
    throw new IOException("Root folder failed to get created");
   }
  }
  reproduceFileFolderStructure(rootNode.getFolderOrFile(), rootFolder);
 }
 
 private void reproduceFileFolderStructure(List<XTFSFile> currentInput, File parent){
  for(XTFSFile item: currentInput){
   if(item instanceof XTFSFolder){
    System.out.println("Processing folder " + parent.getAbsolutePath() + "\\" + item.getName());
    File newParent = new File(parent, item.getName());
    newParent.mkdir();
    reproduceFileFolderStructure(((XTFSFolder) item).getFolderOrFile(), newParent);
   }else if(item instanceof XTFSFile){
    System.out.println("Processing file " + parent.getAbsolutePath() + "\\" + item.getName());
    try {
     new File(parent, item.getName()).createNewFile();
    } catch (IOException e) {
     System.out.println("Skipping due to IO error");
    }
   }else{
    throw new IllegalStateException("Unrecognized class of the object");
   }
  }
 }
 
}


As you can see it uses recursive function to walk through a tree and process every node depending on its type. Point the attention to lines #22, #27. We have to check which type exactly the node implements as we process files and folders in different way. It is also very important how you order type check (it's important to check if the object is of Folder type first).

The new and finalized application sources you can find here. It now has combined dump/reproduce features with single entry point. You also may download the built solution which is ready to use.

Wednesday, June 27, 2012

How To Dump File Structure To XML. Part 2.

So, here in Part 1 of the post we prepared XSD schema keeping the data-model of our data we're going to store. Now we're ready to prepare parser, wrap it with some 'business-code' and try out.

Generating JAXB parser classes

Let's do that. First of all locate your JRE (I'm sure you have one). There in /bin folder you should find xjc executable. Copy your schema there (let its name be fstoxml.xsd) and run the command 'xjc fstoxml.xsd'. What's it done? It converted the types described in your schema to the parser classes and put it to the package generated basing on the schema namespace. Check the previous part of the post to see the namespace. It is "http://www.notifymeplease.org/fstoxml/schema" which means the package will be "org.notifymeplease.fstoxml.schema". Refer to xjc help to know how to place the classes to different package.

After xjc finishes processing you find the classes under the folders corresponding to the mentioned package. These are your XML parser. Add them to sources of your Java project and get ready to write business wrapper. One important thing to note: after you have added generated classes to your sources go to XTFSFolderRoot.java and add @XmlRootElement(name = "root") annotation just before class definition. That will indicate that the element is devoted to be the root one.

Dump File Structure To XML

Remind that our business-need is to scan the file-structure (starting from some root) and dump it to XML file, so we need the recursive procedure to walk through the tree and the approach to save it. At the bottom of the page you may find the simple code with the comments describing everything that happens there.

The code fetches the value of root property from the resource bundle. The thing to know about resource bundles is that
- the file extension should always be 'properties'
- if no language code specified in the property file name as the suffix, the default one will be used.
- property file should be placed somewhere in classpath
So for current example we should have conf.properties file under the classpath

Then code creates 'root' object and fills it with the help of recursive procedure that goes across the underlying file system and populates the object dependencies.

P.S. - You may find the project sources here.
P.P.S. - You may find the built application here.
P.P.P.S. - Here is the Part 3 where I'm telling how to reproduce file system from generated XML file
To use the built application you should do the following

1. Unpack the archive to somewhere
2. Make sure you have JRE installed and JRE bin folder in your environment PATH variable
3. In the folder you've unpacked the archive to set up the root folder to scan in conf.properties
4. Run the command 'java -jar fstoxml.jar'. You should now see the generated file. For example the generated file for this project src folder looks like
.
<?xml version="1.0" encoding="UTF-8" standalone="yes"?>
<xtfsFolderRoot xmlns="http://www.notifymeplease.org/fstoxml/schema" path="C:\FSToXML\src">
    <folder name="org">
        <folder name="notifymeplease">
            <folder name="fstoxml">
                <file name="FSToXML.java"/>
                <folder name="schema">
                    <file name="ObjectFactory.java"/>
                    <file name="package-info.java"/>
                    <file name="XTFSFile.java"/>
                    <file name="XTFSFolder.java"/>
                    <file name="XTFSFolderRoot.java"/>
                </folder>
            </folder>
        </folder>
    </folder>
</xtfsFolderRoot>

.

Code Snippet.

This is the main code utilizing the parser.

package org.notifymeplease.fstoxml;

import java.io.File;
import java.io.FileOutputStream;
import java.io.IOException;
import java.util.ArrayList;
import java.util.List;
import java.util.ResourceBundle;

import javax.xml.bind.JAXBContext;
import javax.xml.bind.JAXBException;
import javax.xml.bind.Marshaller;

import org.notifymeplease.fstoxml.schema.XTFSFile;
import org.notifymeplease.fstoxml.schema.XTFSFolder;
import org.notifymeplease.fstoxml.schema.XTFSFolderRoot;

public class FSToXML {

 public static void main(String[] arg) {

  ResourceBundle bundle = ResourceBundle.getBundle("conf");
  File root = new File(bundle.getString("root"));

  try {
   // Creating JAXBContext to handle the classes from specified package
   JAXBContext jaxbContext = JAXBContext.newInstance("org.notifymeplease.fstoxml.schema");
   // Create marshaller to save data to disk
   Marshaller marshaller = jaxbContext.createMarshaller();
   marshaller.setProperty(Marshaller.JAXB_FORMATTED_OUTPUT, new Boolean(true));
   // We should not start from not a directory
   if (!root.isDirectory()) {
    throw new IllegalStateException(
      "Root should represent a folder. Current root: " + root.getCanonicalPath());
   }
   // Creating the main Node. The root of further xml output
   XTFSFolderRoot rootNode = new XTFSFolderRoot();
   // Specify attribute
   rootNode.setPath(root.getCanonicalPath());
   // Populate the content
   long start = System.currentTimeMillis();
   rootNode.getFolderOrFile().addAll(populateBody(root));
   // Save to disk
   marshaller.marshal(rootNode, new FileOutputStream("jaxbOutput.xml"));
   System.out.println("Time spent(ms): " + String.valueOf(System.currentTimeMillis() - start));
  } catch (IOException e) {
   e.printStackTrace();
  } catch (JAXBException e) {
   e.printStackTrace();
  }
 }
 
 /**
  * Recursive method of populating the list 
  * @param root
  * @return
  */
 
 public static List<XTFSFile> populateBody(File root){
  File[] newSet = root.listFiles();
  ArrayList<XTFSFile> newList = new ArrayList<XTFSFile>();
  
  // Having the sequential file (which actually may appear to be a folder)
  for(File item: newSet){
   // Check if it is a file
   if(!item.isDirectory()){
    /**
     * It's a file, so just create new object,
     * set the corresponding name
     * and add it to the list
     */
    XTFSFile newFile = new XTFSFile();
    newFile.setName(item.getName());
    newList.add(newFile);
   }else{
    /**
     * It's a folder. so create folder object,
     * set the name of the folder, and populate the content
     * using the same method we're in now
     */
    XTFSFolder newFolder = new XTFSFolder();
    newFolder.setName(item.getName());
    newFolder.getFolderOrFile().addAll(populateBody(item));
    newList.add(newFolder);
   }
  }
  
  // After all has finished, return the result
  return newList;
 }

}

.

How To Dump File Structure To XML. Part 1.

Goal: Having XSD grammar to describe file structure

Assume you want to reproduce (replicate) the file structure of some host you have no the direct access to. Assume you just want to save the file structure to perform some evaluation against it. The best way is to store it in XML file. This post is about how to do that. Also as a side effect the following topics're going to be slightly touched:

- JAXB: How to generate xml file from scratch
- How to apply XSD to build convenient XML parser via xjc.

So first of all we need to design the schema of the data we're going to keep. Having such the schema will allow us to build the parser which will be used to write the data to xml and to read them from it in a very simple way. One may develop the schema by using either DTD or XSD specifications. The second one allows to use xjc translator from j2SE distribution to translate the schema to parser classes.

What meta information do we need?

So let's consider the data structure we're going to process. This should represent the minimal meta-information of the file system. So it should support having the root node, files and folders which in turn should allow holding files and folders inside. Also the structural elements (files and folders) should have the attributes like "name" (mandatory one), "isHidden", "isArchived" etc.

XSD is the format of describing the rules certain XML should be built with. It's a sort of grammar for a language which extends XML. XSD is also the XML so it can represent hierarchical structure where elements have the types dictating the way how one can (and allowed to) use them in their document meeting the schema. For example you cannot assign literal value to the attribute if you specified numeric type for it in the schema.

XSD is the declarative language so that you describe the types (which btw can extend other ones), the relationships, restrictions etc. and then use this information depending on your current need (recall that our need is to build the parser)

Such the declarative nature allows to process XSD with dedicated processors (aka translators) which can generate Java classes representing the types, dependencies and relationships of the entities described in the schema. Such the classes are marked with special annotations and getter methods so that they are easy to use to parse XML via JAXB (JavaXML Binding) technology.

Let's check an example

<?xml version="1.0" encoding="UTF-8"?>
<xs:schema xmlns:xs="http://www.w3.org/2001/XMLSchema" targetNamespace="http://www.notifymeplease.org/fstoxml/schema"
 xmlns:tns="http://www.notifymeplease.org/fstoxml/schema" elementFormDefault="qualified">

 <xs:element name="root" type="tns:XTFSFolderRoot"/>
 
 <xs:complexType name="XTFSFolderRoot">
  <xs:sequence minOccurs="0" maxOccurs="unbounded">
   <xs:choice>
    <xs:element name="folder" type="tns:XTFSFolder"/>
    <xs:element name="file" type="tns:XTFSFile"/>
   </xs:choice>
  </xs:sequence>
  <xs:attribute name="path" use="required"/>
 </xs:complexType>
 
 <xs:complexType name="XTFSFolder">
  <xs:complexContent>
   <xs:extension base="tns:XTFSFile">
    <xs:sequence minOccurs="0" maxOccurs="unbounded">
     <xs:choice>
      <xs:element name="folder" type="tns:XTFSFolder"/>
      <xs:element name="file" type="tns:XTFSFile"/>
     </xs:choice>
    </xs:sequence>
   </xs:extension>
  </xs:complexContent>
 </xs:complexType>

 <xs:complexType name="XTFSFile">
  <xs:attribute name="name" type="xs:string" use="required" />
  <xs:attribute name="isHidden" type="xs:boolean" use="optional"
   default="false" />
  <xs:attribute name="isReadOnly" type="xs:boolean" use="optional"
   default="false" />
  <xs:attribute name="isArchived" type="xs:boolean" use="optional"
   default="false" />
 </xs:complexType>

</xs:schema>

Mapping "types" to "tags"

This simple schema represents the data structure we're going to use. It consists of three types description: XTFSFile, XTFSFolder (which extends XTFSFile) and XTFSFolderRoot. These types will be then translated to corresponding Java classes and will contain getter methods for each the attribute returning the values of specified types for those attributes.

Note that the types do not mean tags in your xml which you're going to build according to this schema. To describe the rules of how to arrange the tags you should come up with so called "elements". Here in the example schema it is seen that we have element "root" (which describes how to use root tag in your XML). This element is of type XTFSFolderRoot. Notice that when we refer to this type we have to specify the namespace of the document we're currently developing. This is required to distinguish your custom types from the types of "http://www.w3.org/2001/XMLSchema" namespace. 

XTFSFolderRoot implies that we can have the sequence of  "folder" or "file" tags under the "root" one. This sequence can be infinite or it can not exist at all (minOccurs="0" maxOccurs="unbounded"). Folder and file tags should meet the rules described in XTFSFolder and XTFSFile types correspondingly. Note that folder type implies holding elements of either files or folders which is actually the  recursive dependency.

Types also contain the attribute description with flags of whether they are required or not, and if not then which value to use by default if they are not specified in the document.

So since we have this schema we can create some sample xml file and validate it to ensure the schema works correctly and catches all the places where the document doesn't meet it. However we are not going to use the schema to read the files but rather to write ones. Anyway we should translate it to the Java classes, include them to classpath and write the code to utilize them. 

All this stuff in the Part 2 of this post.

Monday, June 04, 2012

Good Practice: How to store the configuration of your Java-based testing framework. Part I.

Some day your framework (or any other somehow complicated project) will become so big that it will not be convenient to keep the configuration hard-coded or even in the property files. I'm probably saying not even about the configuration in regular meaning but rather about project-specific meta-information. 

What values are we looking for...

You will probably need to store:

  • Credentials
  • Some steps to perform on some stage
  • Resources and some extra attributes for them
  • Connection settings for set of databases
  • Rules for parsing certain data
  • etc.
All this stuff requires certain capabilities from your configuration storage. If you'd like to have easy usage you'd probably expect the following features from that:
  • Nice to keep all such the information in the minimum of files
  • Nice if your storage supports structural data
  • Nice if you have convenient and effective facility to read and write data out of/in that storage
  • Nice if such the format is highly standardized
  • Nice if such the format has the facility to validate the stored data for at least syntax.
  • Great if such the format won't require extra effort for infrastructure setting-up from you
  • Great if the storage keeps the data in the format which can be understood by the human
  • Great if the format allows applying of different IDEs to introduce changes in stored data manually

XML - nice alternative

Well if to take a look onto the items above the two ideas comes on my mind. First one - the idea which addresses all the Nice items. This idea is certainly relational database. However it is hard and heavy solution and may cause pretty annoying problems related to the connectivity. 
Another way is both Nice and Great. I'm talking about storing your meta-information in xml file. If you're going to use xml in your project you would probably like to apply good practice of such the pattern.

If you decided to use xml to store your data it's great to have the understanding of which exactly data you're going to store there. The very good way to understand it and to keep acting according that understanding is to design the xml-schema which does actually represent the model of data you're going to store and use.
Once you have such the schema you'll be able not to understand and troubleshoot any data-structure-related problems of your project but also will be able to use such the sweet features like validating your files against that schema and using dedicated IDEs so that you'll have the code assistance feature enabled.

Xml-schema is the sort of grammar constraints of the language your going to describe your project's meta-information with. Applying such the grammar to your configuration file will allow to catch wide set of improper data problems until your main code gets executed. 

Here you may find small but effective tutorial on how to understand and to use the schema file.

Later on I'll tell how to use all the features I told above for the real example. 

Tuesday, May 22, 2012

WebDriver: The way to obtain element hidden under another (but static) one. Or how to fight with elements covering targets of your interaction

UPD: If you'd just like to scroll to the element that's somewhere at the bottom of the page see the solution here.

Assume you have the page with static bar (as in my case). This bar resides at the very bottom ov the page and is actualy stuck there whatever scroll you perform, so the user has the access to some feature permanently. Since such the UX has been introduced in the site I'm currently testing, some of my tests started to fail with the exception like this:
Element is not clickable at point (316, 494). Other element would receive the click
This was caused by the fact that the element does actually exist and is found by corresponding methods of webdriver, however it resides under that bar (that is static and alway at the bottom of the visible screen) element which actually received the click.

That's why we have two ways to resolve here. One - to remove the element which receives the click by javascript. However that is quite non-representative approach so we're NOT going to review it here. Another way is to scroll the page unil our required element becomes visible.

First you need the facility to execute javascript in your browser. The common practice is to have the method like this:
 public void runJS(String jsToRun){
  logger.debug("Running custom java script: " + jsToRun);
  ((JavascriptExecutor)getDriver()).executeScript(jsToRun);
 }

where getDriver() just returns your current WebDriver instance.
So, how to scroll the page in the browser. Again it can be done with certain javascript function execution. Such the script is very simple:
window.scrollBy(0,50);
This script means that we're scrolling the page to 50 px down (vertically) and not scrolling any px horizontally. Obviousely if we scroll 50 px down that does not mean that's enough. Probably we still have to proceed. So, how to design the iterative procedure meeting our expectation and going to be working fine. My suggestion is to introduce additional method. Let it be named scrollUntilVisibleAndClick. Check the source of the method first and then I'll explain how it works.

 public void scrollUntilVisibleAndClick(WebElement element, int maxScrollCout) throws YourOwnAutomationException{
  try{
   element.click();
   logger.debug("Element [" + element + "] is visble and successfully clicked.");
  }catch(WebDriverException e){
   logger.debug("Looks like the element is not clickable. Attempt to scroll down. MaxScrollCount = " + maxScrollCout);
   logger.debug(e.getMessage());
   if(maxScrollCout > 0){
    runJS("window.scrollBy(0,50);");
    scrollUntilVisibleAndClick(element, --maxScrollCout);
   }else{
    throw new YourOwnAutomationException("Couldn't scroll to the requested element");
   }
  }
 }

Let's now see how it works. To make this approach work you have to locate the element first. Once it is done you passes the element to the described method along with the parameter maxScrollcount which restricts the number of tries. The method attepts to click the element (doesn't matter if it is problematic from our standpoint). If it does, WebDriverException exception gets thrown. However we do not pass it on, but catch it and try to scroll down the page. Then we recursively call the same method with decreased "time-to-leave" parameter.
As the result of the method execution we can get the two finals. Either the maxScrollCount will reach zero and script will fail, or some new attempt after certain scroll will be successfull and the element will receive the click. 

Tuesday, May 15, 2012

Selenium Java client: proper way of how to know that the certain element got disappeared

Im one my previous posts I suggested the way on how to ensure the certain element disappeated in your test scenario code. That usually the case of Web UI testing as it is not only important that something is shown on your click but also that something stopped being shown. Now let me introduce the right way on how to do that :)

So assume you have the following function devoted to looking up the fact the element on the page disappeared. You call it somewhere from your scenario code.

public boolean lookupXPathDoesNotExist(final String xpath) throws CustomAutomationException {
 
try{
 new WebDriverWait(getDriver(), AWAITING_THRESHOLD_MS/1000, 1000).until(
  new ExpectedCondition<Boolean>(){
   @Override
   public Boolean apply(WebDriver d) {
    if (d.findElements(By.xpath(xpath)).isEmpty()){
     return new Boolean(true);
    }else{
     return new Boolean(false);
    }
   }
  }
 );;
}catch(org.openqa.selenium.TimeoutException e){
 throw new CustomAutomationException("Timeout exceeded - however the element is still visible");
}
return true;
}

To make it work you should consider the following:
AWAITING_THRESHOLD_MS - is the constant holding the timeout you'preffer to fail your scenario after in case the element is still on the page
getDriver() - is the function that somehow returns the current acting webdriver
1000 (the last parameter of WebDriverWait method) - the interval between repeated tries

Read also How To Check That Element Is Present In Another Element

Thursday, April 26, 2012

ANT: how to load library on the fly (at the runtime)

This post was caused by the try to use sshexec ant command in my build scenario. However the regular ant distribution does not contain the classes supporting functionality for that task. So the simplest but not flexible way is to get the corresponding jar file and put it under ANT_HOME/lib. Otherwise you will get the message like this
Problem: failed to create task or type sshexec
Cause: Could not load a dependent class com/jcraft/jsch/Logger
       It is not enough to have Ant's optional JARs
       you need the JAR files that the optional tasks depend upon.
       Ant's optional task dependencies are listed in the manual.
Action: Determine what extra JAR files are needed, and place them in one of:
        -D:\apache-ant-1.8.3\lib
        -C:\Users\username\.ant\lib
        -a directory added on the command line with the -lib argument
But if there is a way to attach the library in a runtime? Yep, such the way exists. So you have to do the following:
1. Download the ant-classloadertask.jar and place it where the resources of your build procedure reside
2. Download jsch-0.1.47.jar that supports ssh communication used by sshexec task
3. Use the following pattern in your ant scenario


<target name="execute-ssh-command">

 <property name="jarfolder" value="D:/resources/jars"/>
 <property name="ssh.support" value="jsch-0.1.47.jar"/>
 <property name="custom.class.loader" value="ant-classloadertask.jar"/>

 <!-- Define task for new classloader -->
 <taskdef resource="net/jtools/classloadertask/antlib.xml" classpath="${jarfolder}/${custom.class.loader}"/>
 
 <!-- Load the required jar -->
 <classloader loader="system" classpath="${jarfolder}/${ssh.support}"/>

 <property name="command.input">
 <!--
  Some input for ssh command here
 -->
 </property>
 
 <sshexec host="YOUR_HOST" username="YOUR_USERNAME" command="YOUR_COMMAND" inputproperty="command.input"/>
 
</target> 

Tuesday, April 17, 2012

ANT example on how to get local disk path of perforce branch

This example will show how to combine batch scripting practice with ant scripting one to make you capable to operate with the local disk paths of the branches of perforce version control system. This will also highlight the example of how to use marcrodef in ANT.

So to be able to fetch branch local path from perforce you have to know the following

  • which perforce server and port you're going to connect to
  • which credentials
  • the client you'd like to use (different clients may map the one branch to different places on your hard drive)
  • Finally the path you would like to convert

So manually the operation will look like this:
>p4 -p<server_name>:<server-port> -u<user_name> -P<password> -c<client_name> where <branch_or_file>

this command requests the server and returns the following output:
//depot/your_branch //YOUR-CLIENT/your_branch YOUR-CLIENT-ROOT\local_path_of_your_branch 
This is actually the problem preventing us from using the only ant to run it as the information we need resides at the last token of the string (YOUR-CLIENT-ROOT\local_path_of_your_branch)
That's why I use batch scripting here. The batch will take the configured command as the input, parse it and return only required part. This is achieved by a simple script (let it be named parse-p4-output.bat) that is actually represented with single line

FOR /F "tokens=3 delims= " %%A IN ('p4 -p%1:%2 -u%3 -P%4 -c%5 where %6') DO ECHO.%%A

For /F command breaks the output of the command from parentheses into set of tokens using the delimiter specified after delims= pattern. We need the third one so the command hods the following structure (taking into account that the delimiter is just the single white-space): "tokens=3 delims= "

Lets now switch to ant. To make the usage of this functionality convenient we're wrapping it with so called macrodef. Once it is defined it can be used wherever in the script in very simple way.

So, here is how it should look like. Somewhere in the ANT script we'd like to call the instruction like this:

<get-disk-path 
 path="//depot/your_branch" 
 save-to="save.to.prop"
 p4-host="your-server"
 p4-port="your-port"
 p4-user="your-user"
 p4-pswd="you-password"
 p4-clnt="YOUR-CLIENT"
/>

Here you see the obvious set of attributes. Basically the usage of such the macrodef (syntactically) does not differ from the regular ant task. The only comment for that is that after the instruction has been called the property save.to.prop will be holding the required output (and definitely you may specify your own).

Below is the definition of such the macrodef. You should describe it out of any target right under the project element.

<macrodef name="get-disk-path">
    <attribute name="p4-host"/>
    <attribute name="p4-port"/>
    <attribute name="p4-user"/>
    <attribute name="p4-pswd"/>
    <attribute name="p4-clnt"/>
    <attribute name="path"/>
    <attribute name="save-to"/>
    <sequential>
    <exec executable="parse-p4-output.bat" 
     outputproperty="@{save-to}"> 
     <arg value="@{p4-host}"/>
     <arg value="@{p4-port}"/>
     <arg value="@{p4-user}"/>
     <arg value="@{p4-pswd}"/>
     <arg value="@{p4-clnt}"/>
     <arg value="@{path}"/>
    </exec>
    </sequential>
</macrodef>

So this is how such the feature can be implemented. Inner code of macrodef calls the batch scenario. It parsed the command output and returns back to ANT. Then the output is placed into the specified property and can be used in the regular ANT instructions. 

Friday, April 13, 2012

ANT example on how to control whether to perform building or not depending on the version in your local perforce repository

Assume you have the ANT build procedure intended to be run on demand. Assume also you would like to automatically check if you have the latest version of your source files in your local version control repository (that is certainly not a problem if you use building as a part of continuous integration flow). This example shows how to design such the procedure using perforce version control. The same approach can be used for any command-line VC-system.

Say that will be enough to use the following properties to make your solution customizable:
changelist.to.sync.number - the number of changelist. Being not set means you'd like to sync the head revision
p4.hostp4.portp4.userp4.passwordp4.client - set of properties to establish the connection to perforce server
p4.project.path - path to project to sync on perforce server
email.serveremail.portemail.passwordemail.useremail.sender.aliasemail.sender.from, email.to - set of properties to establish connection with email server.

Here is the ANT script doing what we want to

<project name="deploy.on.demand" default="default">
 
 <!-- Load properties to customize particular run -->
 <property file="${basedir}/builder.properties"/>
 
 <target name="default">

  <!-- Build the suffix for p4 cmd line -->
  <condition property="changelist.to.sync" else="#head" value="@${changelist.to.sync.number}">
   <isset property="changelist.to.sync.number"/>
  </condition>
  
  <!-- Call perforce sync command -->
  <exec executable="p4" failonerror="true" outputproperty="exec.output">
   <arg value="-p${p4.host}:${p4.port}"/>
   <arg value="-u${p4.user}"/>
   <arg value="-P${p4.password}"/>
   <arg value="-c${p4.client}"/>
   <arg value="sync"/>
   <arg value="${p4.project.path}/...${changelist.to.sync}"/>
  </exec>
  
  <!-- Parce perforce output to figure out if you have the latest virsion -->
  <condition property="dont.do.further.actions">
   <contains string="${exec.output}" substring="file(s) up-to-date"/>
  </condition>

  <!-- Call actual build procedure if you don't have one-->
  <antcall target="futher.actions"/>
  
  <!-- Notify the user you are not going to build if you have one-->
  <antcall target="notify.reject.building"/>
  
 </target> 
 
 <target name="notify.reject.building" if="dont.do.further.actions">
  <mail mailhost="${email.server}" mailport="${email.port}" ssl="flase" password="${email.password}" user="${email.user}" subject="Building rejected!">
   <from name="${email.sender.alias}" address="${email.sender.from}"/>
   <to address="${email.to}"/>
   <message>Building is not going to be performed as you already have requested CL (${changelist.to.sync}) in your local repository</message> 
  </mail>
 </target>

 <target name="futher.actions" unless="dont.do.further.actions">

  <!-- Make actual build here -->
  
 </target>

</project>

First we should execute the command to sync the branch we'd like to build from. To do this we have to convert the desired version number to the syntax perforce understands. Exec target is configured to output the result to the specific property.
Then we parse that property to know if it contains the sub-string perforce returns when it is nothing new to sync. Once it has the corresponding build target is triggered. Otherwise the mail notification is sent so that anyone interested knows the build procedure is not going to be performed.


Wednesday, April 11, 2012

How to uninstall windows application using ANT

Let's now pretend we'd like to uninstall standard windows application. Manually you would be doing the following:
1. Go to Uninstall programs
2. Locate the application you'd like to uninstall and then pass through set of dialogs.

But we'd still like to do it automatically. So to do that we need to know the application name we're going to get rid of. This name should be identical to one registered in the system.
Obviously ANT only reproduces the actions the human can do so if we uninstall the application via cmd we would use wmic tool. Make sure you have one (I'm sure you do) but just call it for the first time to let it register in the system.

So the line will look like this wmic product where name="Your Application Name" call uninstall


Lets use execute command to reproduce this line. Finally the script will look like this:


<project name="uninstall-application" default="default">
 
    <target name="default">
        <exec executable="wmic">
         <arg value="product"/>
         <arg value="where"/>
         <arg value="name=&quot;${application.to.uninstall}&quot;"/>
         <arg value="call"/>
         <arg value="uninstall"/>
        </exec>
    </target>
  
</project>

Just propagate application.to.install property to your script and enjoy. That is all. Not the rocket science.

Tuesday, March 27, 2012

How to install msi package using ant


Problem:
to install msi package in silent mode using ANT.

Constraints:
1. some prodcuts require system rebooting after installer finishes working. That is represented in some exit code (or a set of possible codes) meaning approximately the following: "It is all okay but still user actions required". So you never get 0 exit code meaning regulary success operation completion.
2. sometimes we need not just click Next> while installing the package but rather specify some custom specifications on installation phase. This is sure our case :) Assume we need to override some public property of msi package. Let it be named SOMEPROPERTY and the value we'd like to assign is SOMEVALUE

Solution:
Actually several solutions could be applied to solve this problem. The simplest one is to set failonerror attribute of ant execute task to false. Such the solution has quite big and quite obviouse disadvantage: your automated procedure will never know any problem has happened. But we would actually like to skip the only one exit code to consider it successfull.
To achieve that we should approach with batch scripting (remember we're acting under windows as we're trying to imstall msi package which is true windows stuff)

so lets introduce the following batch script

msiexec /i %1 /qn SOMEPROPERTY=%2

IF ERRORLEVEL 1642 GOTO ERR

IF ERRORLEVEL 1641 GOTO 1641

IF ERRORLEVEL 1 GOTO ERR


:1641
ECHO.Returned expected error code. System is getting to be rebooted...
EXIT 0

:ERR
ECHO.Uexpected error code: %ERRORLEVEL%
ECHO.failing..
EXIT %ERRORLEVEL%

So, what we expect from this script? First of all we expect it to install the package we propagate via script argument %1 and set the property SOMEPROPERTY to the value we specify in script argument %2. However we would like our script behave in certain way to address the constraint #1 (see above)

In the script we call msiexec tool with the keys /i (install the package) and /qn meaning silent non-gui installation. The lines below address the problem of exit codes. We should catch the code meaning "Its okay but the system's going to be rebooted now". This is encoded with the exit code sequence 1641. However the called process may return some other code which we should consider as not successful. This is achieved by "IF ERRORLEVEL" and "GOTO" batch language construction.

IF ERRORLEVEL N returns true if the returned exit code equals or grated than N. That is why we try to catch all errors higher than N (=1641)


IF ERRORLEVEL 1642 GOTO ERR


... and all errors lower than N

IF ERRORLEVEL 1 GOTO ERR
The order of instructions invocation makes us sure we'll get to :1641 label if only the expected installation state will take place
So now we just should call the batch from ANT passing the corresponding cmd arguments like this:
<exec executable="install-msi.bat" failonerror="true" >
 <arg value="&quot;PACKAGETOINSTALL.msi&quot;"/>
 <arg value="&quot;SOMEVALUE&quot;"/>
</exec> 

Wednesday, March 21, 2012

Ant practice on how to build your file with substituing the @tokens@

The usual need of a person going to build the code is to keep the certain properties in separate file and move the property values to certain files on build stage. This is what the article about. Let's look and the very small example.

Assume we have the following property file (let's name it "configuration properties")
user.role=admin
user.login=superuser
user.password=whoifnotme

and the following file we're going to build (settings.xml)
<settings>
 <users>
  <user id="@user.login@">
   <role>@user.role@</role>
   <password>@user.password@</password>
  </user>
 </users>
</settings>

Let's place the files above to d:/temp/props_src and would like to build the file settings.xml to the folder d:/temp/props_build.

Here is how the ant script should look like

<project name="testBuildCodeWithProperties" default="start" basedir=".">

 <property name="sourceDir" value="d:/temp/props_src"/>
 <property name="targetDir" value="d:/temp/props_build"/>
 
 <target name="start">
  <copy todir="${targetDir}" overwrite="true">
   <fileset dir="${sourceDir}" includes="*.xml"/>
   <filterset filtersfile="${sourceDir}/configuration.properties"/>
  </copy>
 </target>
 
</project>

Note that we should not write any specific script to substitute the values. The only inbound data we need to have to build the file is actually the template of a file to build and the property file to be used in filter set. The @ symbol is used by default to point out the tokens in the template file. However you may change it by specifying begintoken and endtoken attributes of filterset.

Sunday, March 04, 2012

When WebElement.click() doesn't work in Selenium2 WebDriver

Sometimes I face the problems when regular WebElement click() method does not work. For example I met such the problem when tried to locate the link under H2 like the following snippet:

<h2>
 <a href="something" title="something">Some text</a>
</h2>

The regular method of locating like driver.findElement(By.xpath("somexpath")).click() led to the exception saying some other element will get the click instead of one located by me. So I applied the following work-around:

 public void safeClick(WebElement element){
  Actions builder = new Actions(getDriver());
  builder.moveToElement(element).click().build().perform();
 }
where getDriver() just means your current WebDriver implementation. This made me capable to work-around the problem from one hand and even made click action closer to the actual action sequence performed by the user clicking anything on the page. 

Monday, February 27, 2012

Lazy way on how to generate pretty huge set of distinct (unique) hex values

We sometimes need to generate huge set of quite short distinct identifiers. Another requirement is that the identifiers generated with the chosen method (despite of a huge generated set) are still from the much bigger set and actually represent a small subset of that (this for example could help when you generate the number which you would like is hard to guess. probably to generate the invites for your site).

Here is the lazy way on how to do that using java. Using it I generated 500K distinct hex values (8-digit in a maximum) from 4.3 bil total space in a few seconds. That means the user will have to try to guess the right value for approximately 9K times.

So.. this is the code

import java.io.BufferedOutputStream;
import java.io.FileOutputStream;
import java.io.IOException;
import java.util.ArrayList;
import java.util.UUID;


public class Generator {
 
 public class DummyStringKeeper {
  
  String string;
  
  public DummyStringKeeper(String string){
   this.string = string;
  }
 }

 public static void main(String args[]) throws IOException{
  BufferedOutputStream bos = new BufferedOutputStream(new FileOutputStream("c:/temp/items_expoted.txt"));
  ArrayList<DummyStringKeeper> list = new ArrayList<DummyStringKeeper>();
  for (int i=0; i<500000; i++){
   DummyStringKeeper randomItem = new Generator().new DummyStringKeeper(UUID.randomUUID().toString());
   list.add(randomItem);
   String randomItemString = randomItem.toString().substring(randomItem.toString().indexOf("@")+1) + "\n";
   bos.write(randomItemString.getBytes());
  }
  bos.flush();
  bos.close();
 }
 
}

Wednesday, February 15, 2012

Another view on how to simulate multi-user interaction in your Selenium 2 scenarios

I heard from a lot of people that the best pattern for keeping your web driver in the project is singleton. That looks doubtful. 
Since I got the requirement of multi-user interacting in my scenarios I used singleton pattern for webdriver and I had to use the following workflow for interaction
1. Log in with user A
2. Send message to user B
3. Log out with user A
4. Log in with user B
5. Handle the request from user A

That is not quite obvious and organic workflow. The much more convenient is to do something like this

1. Log in with user A
2. Send message to user B
3. Log in with user B
4. Handle the request from user A--- Finish the test or:
5. Log out with user A
6. Log out with user B

Add support for simultaneous work of several browsers

This cannot be implemented having singleton pattern as the one for your webdriver. This is my way of how to support several browsers simultaneously

First of all we need the factory to easily create new browser instances (aka new drivers)

 private static class WDFactory{
  public static WebDriver createWebDriver(Properties properties){
   String browser = properties.getProperty("browser");
   WebDriver driverToCreate;
   if(browser.toLowerCase().equals("*firefox")){
    driverToCreate = new FirefoxDriver();
   }else if(browser.toLowerCase().equals("*googlechrome")){
    driverToCreate = new ChromeDriver();
   }else{
    throw new UnsupportedOperationException("Not supported browser yet");
   }
   driverToCreate.get(properties.getProperty("domain"));
   driverToCreate.manage().timeouts().implicitlyWait(500, TimeUnit.MILLISECONDS);
   return driverToCreate;
  }
 }

Also we sure need the pool where we're going to store all the browser instances we're going to work with

public class WDPool {

 private HashMap<String, WebDriver> pool;
 
 public WDPool(){
  pool = new HashMap<String, WebDriver>();
 }
 
 public void closeDrivers(){
  for (String key: pool.keySet()){
   getDriver(key).close();
  }
 }
 
 public void addDriver(String id, WebDriver driver){
  ARTestCase.logger.debug("Adding driver with id [" + id + "]");
  driver.manage().deleteAllCookies();
  pool.put(id, driver);
 }
 
 public WebDriver getDriver(String id){
  ARTestCase.logger.debug("Returning driver with id [" + id + "]");
  return pool.get(id);
 }
}

Okay. Now you should consider your design. I have the class laying between the browser control engine (like selenium) and the business logic of the scenarios. So if you have one introduce the following method there. Otherwise introduce it into the class where your actual scenario is described

 public void pushDriver(String id){
  driver = WDFactory.createWebDriver(properties);
  stack.addDriver(id, driver);
 }

Here and after stack represents the instance of WDPool.

It will be used on the stage the new user is logging in.
and the facility to obtain the driver instance for the current user

 private WebDriver getDriver(){
  return stack.getDriver(ARTestCase.getCurrentUser());
 }

So now we're ready to instantiate the new browser each time the new user gets logged in. The browser instance is stored into the hashmap with the id holding the user's nick-name. There are only two things to do:

1. Change your log-in functionality of the scenario so that it requests pushDriver. In my case it has the following look:

    public void logIn(String username) throws ARAutomationException {
     getTestCase().getAdapter().pushDriver(username);
     getTestCase().setCurrentUser(username);
 // some actions to perform
    }

Where getTestCase().getAdapter() returns the interlayer of the test case we're currently executing holding all the stuff I'm writing here about.

2. Wherever  you used the pattern like driver.someMethod() you now should use getDriver().someMethod() described in two snippets above. That will make your framework to switch the browsers each time you either log in with new user or call

getTestCase().setCurrentUser(existingUserNameHoldingOneOfTheBrowserInstances);

For those who experience problems with Selenium 2 hovering

The common practice of simulating mouse hovering in Selenium 2 is to move the mouse cursor to the element located and wrapped with WebElement. This should look like this.
            Actions builder = new Actions(driver);
            builder.moveToElement(lookupXPathExists(xPath)).build().perform();
Where driver is your current WebDriver implementation and  lookupXPathExists(xPath) is a kind of procedure returning you the WebElement object by xPath (see my older posts for more details)

However a lot of people trying to apply such the approach for both FF and IE browsers experience the same issue: once your scenario tries to perform some next action after hovering (ex. click the button appeared after you have hovered the element) the hovering gets canceled.

So the only way for us is to wait until this issue is resolved. Use Chrome driver so far.. :)

Thursday, February 09, 2012

Selenium antipatterns or What is Selenium the worst for (or 'donts' for Selenium)

You probably know a lot of cases when selenium will help you a lot and will beat any competitor which means it is really the best solution on the market. However I'd like to share the set of the problems the selenium is better to put away from (selenium anti-patterns).

  • Prepare the base state. If you include the base state preparation procedures in your selenium-based framework, be ready you may get them failed which will cause the test fails as well. That will not mean your product functionality does not work in proper way. That will probably mean your base state generation procedure failed due to some instability which is certainly still the sort of seleniums feature combined with the specifics of http servers or network collisions :)
  • Run load testing. You definitely can simulate some load using the selenium just because you can simulate user's work flow with the help of it. Selenium drives the GUI browsers which consumes plenty of resources so even if you use HtmlUnit driver that won't help you much. More over the load generating framework supposes strong discipline of multi-threading beacuse if you have no such one, you may measure your own leaks aka the problems in your framework performance, not of your tested application's. Do not invent the wheel - use JMeter.
  • Accuracy testing. Once your web application delivers some analytics you probably will want to automatically check if the values in your tables are correct. That is bad practice for sure. Depending on your browser's locale the numbers may have different representation, so that is might cause the problems in string casting to number formats. The same is true for date and currency date types. Moreover you likely will have to maintain such the tests quite frequently due to HTML dynamic structure changes because in the most cases such the tables are drawn with the help of dedicated GUI framework which may vary the HTML representation slightly keeping GUI look unchanged for the user. And do not forget that being introducing accuracy assertions you will have to make sure your last assertion procedure matches the business logic of  the tested application
  • Third-party graphics testing like one provided by adobe flash, MS silverlight etc. Use dedicated products to test such the interactions
So those are the tings I'd not recommend to use selenium for. All other web testing stuff matches selenium capabilities pretty good.

Friday, January 06, 2012

Understand JMeter RMI properties

As you probably know JMeter allows to set up distributed cluster to distribute loading among several peaces of hardware resources. To make it available JMeter uses RMI (remote method invocation) technology. That means jmeter parses the scenario and sends the dedicated commands to the loading nodes (injectors) replicating the scenario among them.
RMI communication is built over the network. When JMeter master sends the command to injector it sends the command to invoke injector method to the certain port (RMI port) and awaits the execution results back to the own ports it is listening (local port). The local port is usually not a constant and may vary within certain bounds. It might cause the problems when you use firewall rules blocking the port which is chosen by jmeter as the local port. That's why jmeter gives you the capability of setting up such the port number explicitly.

So you will need to configure the following properties which can be found in /bin/jmeter.properties (do not forget to remove commenting character #). All this is correct for build 2.5.1 r1177103

server_port=1099
That means jmeter master will communicate with injectors using this port as default one

server.rmi.localport=4000
This port is used to get the response on the method that is executed from the server elsewhere.

client.rmi.localport=4000
This parameter is responsible for setting up the port the client (master node) will get the responses from the samplers been running on a server (slave aka injectors).

You may also find the parameter server.rmi.port but it actually does nothing (according to jmeter source code) and is overwritten with server_port parameter in case it is uncommented and has non-zero value when jmeter starts as the server.

The one important thing to know: always specify remote_hosts parameter (on the client side) with the servers in following notation: SERVER_NAME:SERVER_PORT where SERVER_PORT is the one set up with server_port parameter on the certain server (aka slave aka injector). The build I have used for this post (see above) had the defect (aka undocumented feature) in node looking up procedure in the registry.

That seems to be it.