Showing posts with label tools. Show all posts

Friday, June 14, 2013

SquashTM (Squash TM) 1.5.0 test management system review

Introduction

Let's  continue exploring test case management systems. This time I chose the one called SquashTM (Squash Test Management or Squash TM) - open-source pretty looking and of broad functional scope tool from French team. Unlike some other products SquashTM offers full scope of functions on free-of-charge basis which definitely gives some extra points to the system.
You also might want to visit my previous review of Zephyr Desktop TCMS. In such the case please follow this link.

Web-site

One of the weakest components of the product is the web-site. The face of a product intended to raise the popularity has the big problem with localization. Shame on me, but I really don't speak French and I guess the most part of the world doesn't. Coming to the site of a product pretending to be the world-wide famous one in some observable future I expect to see convenient English version. I believe that will help to develop and to distribute the product much faster than now.
Well.. Anyway I tried to use google translate and that helped me to manage to download the binary distribution. By the moment the latest available (and stable) version is marked as 1.5.0. The supported operating systems are:
  • Windows
  • Mac OS
  • Linux
The site has a Wiki part. The wiki made me completely confused. Fortunately it is written in English but the table of content has the topics ordered alphabetically. Thus the installation guide can be found somewhere in the middle of the topic list, however the most convenient place I guess is somewhere at the top.

Installation

SquashTM (or Squash TM) is distributed as jar installer (for Windows OS at least). Despite I chose English version the installation wizard still supplied the dialog controls with the captions like "Suivant" and "Quitter". Fortunately the control icons didn't give me the chance to go the wrong way. Just click the button with big green forward-arrow every time and you will succeed.
SquashTM (or Squash TM) fits people who would like to play with the system before take the positive or negative decision and at the same time wouldn't like to spend much time for setting application up as it comes with default H2 database. So you can use it right after the installer finish working. 
Looks like there is no way to migrate the data from the default database to your custom one (MysSQL is supported). There is direct warning in the Wiki at least saying literally the following

 Caution : by switching to a MySQL database, all data previously entered in the on-board database will be lost.

You can also install the system as Windows service so you don't have to care of starting the application each time your server gets rebooted.
SquashTM (or Squash TM) distribution binds to 8080 port by default so don't forget to change it once you've got a lot of web services running at your server. But please be aware of the official instructions which acn e found on this page are not correct. In my case I had to change environment variable HTTP_PORT as well to make my instance working on non-default one.

Features

SquashTM (or Squash TM) offers the standard set of features (see official terms description here)
  • Integrating with SquashTA (the review is coming)
  • Managing the isolated projects
  • Managing Requirements (with customizable fields and versioning)
  • Managing test-cases (with customizable fields)
  • Managing campaigns (with customizable fields)
  • Test steps support fields customization
  • Iterations support field customization
  • Integration with mantis bug-tracking system
  • Managing the users and the teams. Each user should be assigned with the predefined permission set called "Profile". See the details here.
  • Reporting

Usability

 General controls

In general the application UI looks quite attractively. The layout consists of three vertical column. The leftmost one and the most narrow at the same time holds workspaces controls. Using it you can switch between requirements, test-cases, campaign and report workspaces. Once you choose one you see two other columns. 
The middle column holds the tree of entities which are currently under management according to workspace selected. You may add, edit or remove entity, arrange them by the folders and perform searching there.
The leftmost and the biggest column contains the particular entity's details. Another thing I like in the application is that once you edit anything you're provided with rich editor and able to format the text with the broad scope of formatting controls

Requirements and Test-cases

The approach of binding requirements and test-cases that is used in SquashTM (or Squash TM) doesn't look very comfortable to me. It is supposed that you create set of the requirements and set of the test-cases which are not related to each other originally. Those sets might be of a huge number of items. Then you may do one of the following
  • either go through each requirement and bind it (every one) to one ore more test-cases
  • or go through each test-case and bind it to one ore more requirements
This seems not introducing big problems until you have big project with a lot of requirements and a lot of test cases and very complex requirement hierarchy.
The much more convenient way would be creating the test-cases straight from the requirement which is not possible in the current version. Thus having the requirement created (not necessarily by the current user - probably by another one) the dedicated tester could cover it with the set of appropriate test-cases and, say, mark it somehow as covered.

Composing test-cases

Unlike the requirements the test-cases are not just the free-text but some complex entity. Each test-case has some general information containing:
  • Name
  • Description
  • Weight: Very High, High, Medium, Low
  • Nature: Undefined, Functional, Business, User, Non Functional, Performance, Security, ATDD (No idea about what it could mean :) )
  • Type: Undefined, Compliance, Correction, Evolution, Regression, End-to-End, Partner
  • Status: Work in progress, Under review, Approved, Obsolete, To be updated (not sure if there is some BPM engine embedded to drive these states automatically)

This is how the general view of the test-case looks like:

SquashTM test cases

All the properties above have nothing to do with the most valuable part of any test-cases - test steps. The steps should be populated at the dedicated "Script" tab. Each step consists of the list of the actions and the expected result. 
You also can assign the particular step to one of the test-case requirements so that it implies that step verifies one. However I couldn't manage to make it work. First strange thing is that when you're managing the requirement set verified by the particular step you're requested to remove unnecessary ones from the entire list of the test-case requirements. IMHO the more obvious way is to mark ones I'd like to include into the step coverage. Anyway.. the second strange thing is that the requirement gets selected if only to click the cell with requirement number (1,2,3...). I would expect the entry is selected wherever I click in the row... The last but the main problem is that despite I choose the requirement and click "Remove from step" button it still remains in the list and not removed.

Here is the step management view:

SquashTM test cases

In addition you can attach files to the test-case or to the particular step of the script. Here I experienced the problem as well as the application rejected my attempt to attach png file to the test-case as the one of not supported formats.

 Campaigns

The test-execution mechanism is supported with campaign concept. The manager can create a campaign - the aggregation for the set of test-cases. Each test-case can be assigned to some user. The campaign should be broken down by the iteration - the particular test run. The iteration may contain the subset of the entire campaign test-case set. If the test-case appears in several iterations of a campaign and gets the certain status in one of the iterations then it has the same status in other ones. This should look like this:

SquashTM campaigns

Once the tester which is assigned with the tests sees the iteration ready in their campaign workspace they may start it like it is shown on the screen-shot:

SquashTM test execution

Clicking "Begin" button takes the user to the steps of the test-case until the steps are over. Once they are the user moves to the next test-case of the iteration automatically until there are no more test-cases in the scope.

Reporting

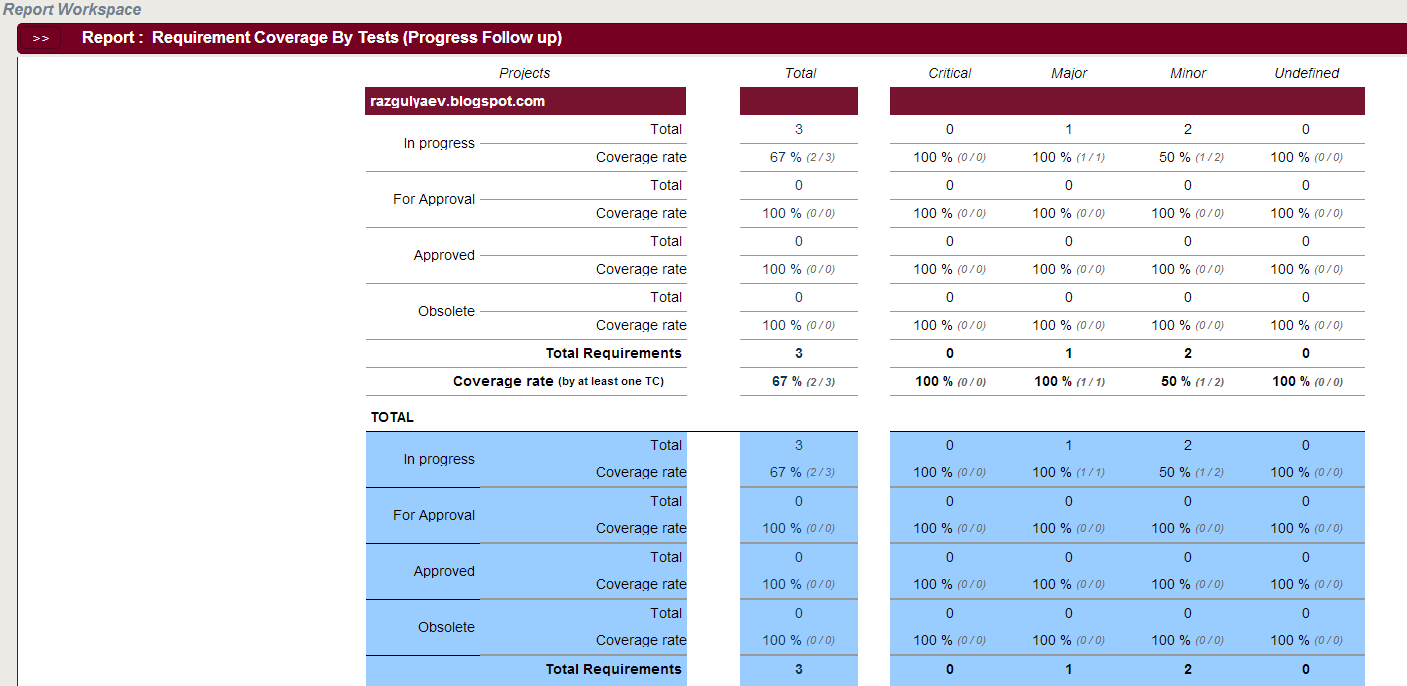
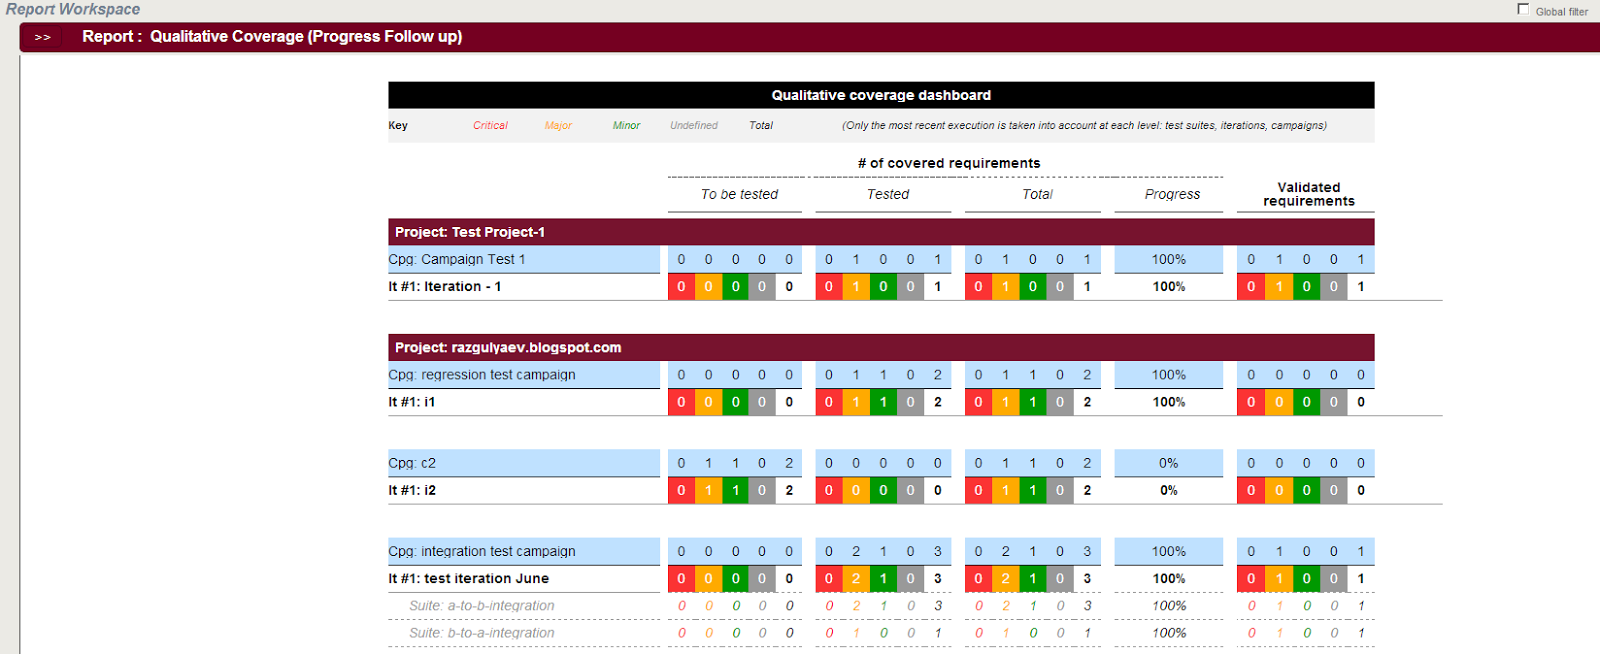
Reporting capabilities of the application leaves ambiguous impression. Officially the tool has quite functional reporting. You may generate the report to analyze your requirements and test cases regardless whether you performed any test execution or not. Each report you may export to PDF format to present the results to your management for example.
Its also possible to generate the report for certain executions (aka campaigns). That's all great however I met the problems again. When I tried to filter the report data by my test project only, the filter couldn't ender the project set in the filter dialog so I had to be content with the all the existing projects in my report.

Here are several examples of the reports I managed to generate:

SquashTM test reports

SquashTM test reports

SquashTM test reports

Conclusion

I'm confused and it is quite hard to give the resolution on the tool. From the one hand from functional and usability standpoints it is the best free test-case management systems I worked with. From another hand it is still quite raw and buggy. Here are some problems I found which I couldn't assign to the topics above and which are mostly related to the user management functionality:
  • Whatever profile I assigned to a user I always saw Advanced Tester one when I came back to the corresponding dialog. However when I log in as that user I see the actually assigned profile for them
  • When I compose the team I see the users I recently deleted and able to get to their details by drilling from the team configuration dialog
  • Annoying problem is that the trees in the workspaces are not always updated in time when you add some sub-entities there
Well. I think despite there are a lot of quite annoying problems in the product they are all eliminated with the fact this tool is freeware and provides good functional scope and nice usability. Yet it fits small and middle-size development teams but the suject has all the chances to become domain standard in the observable future. So I give this TCMS 8.5 points of totally 10. I would give more, but those annoying bugs...

Monday, June 04, 2012

How to easily load web page straight to the DOM

Very useful and light-weight package you may find here. It allows to wrap any html page from the server straight to DOM with no cost at all. Like this one:

org.jsoup.nodes.Document doc = Jsoup.connect("http://yourpage.own").get();

After that you may operate with doc like with just regular document. Another useful thing is locating element using css selector syntax. Here is the example from the official page

Document doc = Jsoup.connect("http://en.wikipedia.org/").get();
Elements newsHeadlines = doc.select("#mp-itn b a");
Powerful tool with broad functionality which is better to get familiar with through the official page. 

Monday, February 27, 2012

Lazy way on how to generate pretty huge set of distinct (unique) hex values

We sometimes need to generate huge set of quite short distinct identifiers. Another requirement is that the identifiers generated with the chosen method (despite of a huge generated set) are still from the much bigger set and actually represent a small subset of that (this for example could help when you generate the number which you would like is hard to guess. probably to generate the invites for your site).

Here is the lazy way on how to do that using java. Using it I generated 500K distinct hex values (8-digit in a maximum) from 4.3 bil total space in a few seconds. That means the user will have to try to guess the right value for approximately 9K times.

So.. this is the code

import java.io.BufferedOutputStream;
import java.io.FileOutputStream;
import java.io.IOException;
import java.util.ArrayList;
import java.util.UUID;


public class Generator {
 
 public class DummyStringKeeper {
  
  String string;
  
  public DummyStringKeeper(String string){
   this.string = string;
  }
 }

 public static void main(String args[]) throws IOException{
  BufferedOutputStream bos = new BufferedOutputStream(new FileOutputStream("c:/temp/items_expoted.txt"));
  ArrayList<DummyStringKeeper> list = new ArrayList<DummyStringKeeper>();
  for (int i=0; i<500000; i++){
   DummyStringKeeper randomItem = new Generator().new DummyStringKeeper(UUID.randomUUID().toString());
   list.add(randomItem);
   String randomItemString = randomItem.toString().substring(randomItem.toString().indexOf("@")+1) + "\n";
   bos.write(randomItemString.getBytes());
  }
  bos.flush();
  bos.close();
 }
 
}

Wednesday, October 26, 2011

Log on failure for specific user after configuring service via sc.exe

Solution

On the host where the service should be running start gpedit.msc. Expand "[Local Computer Policy]\[Windows Settings]\[Security Settings]\[Local Policies]". Click [User Rights Assignment].

Resolving logon problem on trying to start them up via sc.exe

On the right-hand pane double-click the "Log on as a service" policy.
Add the user on behalf of which you're going to run the service. Apply the changes.

That's it

Monday, September 19, 2011

JMeter server does not send back the sampler results on Ubuntu linux

Trying to simulate distributed JMeter configuration over the virtual hosts network (virtualbox) I facedd the set of problems caused by the fact that JMeter does not correctly determine the ip address of the hosts it'r running at. For example I could not even connect to jmeter-server because it considered the local address as the localhost (127.0.0.1). Short investigation showed that the solution is placed inside the jmeter-server file. It says:

# If the client fails with:
# ERROR - jmeter.engine.ClientJMeterEngine: java.rmi.ConnectException: Connection refused to host: 127.0.0.1
# then it may be due to the server host returning 127.0.0.1 as its address

# One way to fix this is to define RMI_HOST_DEF below
#RMI_HOST_DEF=-Djava.rmi.server.hostname=xxx.xxx.xxx.xxx

${DIRNAME}/jmeter ${RMI_HOST_DEF} -Dserver_port=${SERVER_PORT:-1099} -s -j jmeter-server.log "$@"

So uncommenting the RMI_HOST_DEF parameter and specifying the correct address solved the problem. However there were another one. When I ran the scenario I observed the errors in jmeter-server log file. It said the server couln't send back the sampler results as it tried to send it to 127.0.0.1. I couldn't find any solution in jmeter forums so I just applied the same one from jmeter-server to jmeter client.

So one should just edit the jmeter client execution linux bash script so that the last two lines will look like this:
RMI_HOST_DEF=-Djava.rmi.server.hostname=xxx.xxx.xxx.xxx
java $ARGS $JVM_ARGS $RMI_HOST_DEF -jar `dirname $0`/ApacheJMeter.jar "$@"

Where xxx.xxx.xxx.xxx should keep the ip address you're running your jmeter client at.

Monday, July 18, 2011

How to introduce code highlighting into sharepoint wiki articles

Check new series of the articles. Review and user experience on test management systems. Functionality and usability.
-------------------

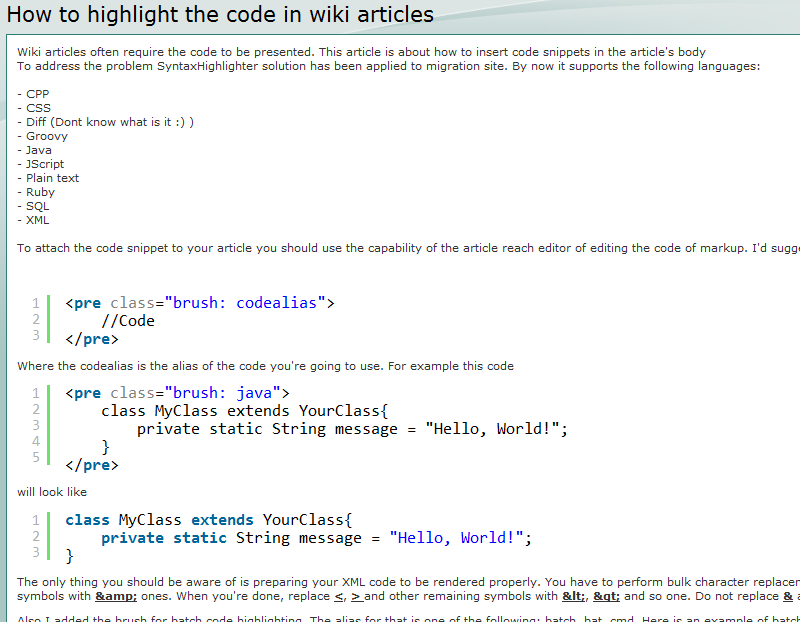
Thats pretty much simple actually. To support highlighting I use SyntaxHighlighter and SharepointDesigner. The goal is to attach the styles and and the jscript to the heading page and finally to execute the highligher code once the page is uploaded. All of the described relates to sharepoint 2007 (free to downlod from Microsoft site). That is also applicable to the version '10 - the only difference is the master page's file name to process.

So here is the set of simple steps to apply the syntaxhighlighter to the master page of your sharepoint site so that all other pages will take that changes as well

0. Download SyntaxHighlighter files to your workstation so that you can to upload them ato your site in future.
1. Start Sharepoint designer and connect to your site. You should now work with Folder List pane.
2. Create folder to keep your SytaxHighlighter files (ex.: __codeHighlighter)
3. Create subfolders for javaScript files and CSS files (actually I keep CSS right under __codeHighlighter but js files under the separate folder __codeHighlighter/js)
4. Upload shCore.css and shThemeDefault.css to __codeHighlighter folder
5. shCore.js and the set of brush files (shBrush*.js) to __codeHighlighter.js
6. Find the master page file. For SP'07 try to find it under _catalogs/masterpage. You should see default.master file there.
7. Copy and paste that file to the same folder. It will get the name like default_copy(1).master.
8. Open that file. Now we should introduce some changes into the source code of the master page (middle area of the web page editor)
9. Paste the following code right before </HEAD> tag somewhere at the very top of the page (you should only specify the brush files you do use).

<script type="text/javascript" src="pathToYourSite/__codeHighlighter/js/shCore.js"></script>
 <script type="text/javascript" src="pathToYourSite/__codeHighlighter/js/shBrushJava.js"></script>
 <script type="text/javascript" src="pathToYourSite/__codeHighlighter/js/shBrushCpp.js"></script>
 <script type="text/javascript" src="pathToYourSite/__codeHighlighter/js/shBrushCss.js"></script>
 <script type="text/javascript" src="pathToYourSite/__codeHighlighter/js/shBrushDiff.js"></script>
 <script type="text/javascript" src="pathToYourSite/__codeHighlighter/js/shBrushGroovy.js"></script>
 <script type="text/javascript" src="pathToYourSite/__codeHighlighter/js/shBrushJScript.js"></script>
 <script type="text/javascript" src="pathToYourSite/__codeHighlighter/js/shBrushPlain.js"></script>
 <script type="text/javascript" src="pathToYourSite/__codeHighlighter/js/shBrushRuby.js"></script>
 <script type="text/javascript" src="pathToYourSite/__codeHighlighter/js/shBrushSql.js"></script>
 <script type="text/javascript" src="pathToYourSite/__codeHighlighter/js/shBrushXml.js"></script>
 <script type="text/javascript" src="pathToYourSite/__codeHighlighter/js/shBrushBatch.js"></script>
 <link href="pathToYourSite/__codeHighlighter/shCore.css" rel="stylesheet" type="text/css"></link>
 <link href="pathToYourSite/__codeHighlighter/shThemeDefault.css" rel="stylesheet" type="text/css"></link>

10. Paste the following code right before </HTML> tag (at the very bottom of the page)
<script language="javascript">   
        SyntaxHighlighter.all();   
 </script> 

11. Save the changes.
12. Right click on that you new master page file and choose Set as Default Master Page.

You are now ready to highlight the code. Create any wiki page. In the reach editor switch to the source view. Add the code according to SyntaxHighlighter examples.


You're done

Wednesday, March 09, 2011

Ant xmlTask

What the strange stuff.. Ant xmlTask can uncomment xml elements but cannot comment them :) All this is delivered by the authors like the reqular order of things. What the strange stuff..

Monday, February 21, 2011

Eclipse. Perfoce. Error in change specification. Can't include file(s) not already opened. Error in change specification. Can't include file(s) not already opened.

Recently I faced the problem using P4-Eclipse integration. The message said like the one specified in this post's subject. So, googling gave nothing but only the that lot of people face the same kind of problem but actually of different reasons. Now after the short investigation I can share my one.
It seems eclipse gets mad if the current client spec is set up with some client view different from looking straight into the storage root. You should either to remap client view or to use another client spec.

Tuesday, February 15, 2011

Selenium 2 + WebDriver. Test drive and first impression

Several months ago I started implementation of automation framework intended for certain social network automated testing. The first time I set the requirement so the framework should be run against Win OS to save the time on setting up the automation context. However I faced the problem with starting selenium server over min Win7 machine so I had to explore the new ways of "click-engine" application. That way became Selenium 2 powered by WebDriver.

The obvious advantages are:
  • Local usage, so less configuration effort required and risks are estimated (may also be considered as disadvantage)
  • Automatic recognition of element type
  • Backward compatibility with Selenium
Disadvantages:
  • Yet not perfect functionality. Even using selenium emulation.
  • Buggy integration with the latest Microsoft products
  • API differs from the classic selenium one so it is pretty much hard to port the Selenium 2 tests to Selenium
Yeah.. So actually I had to move the framework to Linux platform after all as WebDriver stuck on sending long strings to the textboxes. However Linux framework had no such issues at all and it still works fine there.

Thank you!

UPD here

Thursday, February 10, 2011

QA Automation Essentials

What should be set up on your workstation to successfully handle the automation tasks and to successfully ensure the quality of the objects you're testing. Here is the must-have list for starting the test automations


  1. Builders: Apache ANT. Actually you may automate almost all the manual activities on your workstation, not only build processes.
  2. Heavy-weight web browsers: Selenium.
  3. Light-weight web browsers: JMeter
  4. Virtual machine: VirtualBox
  5. Environment to start your framework: JRE 
  6. IDE to develop anything: Eclipse IDE
  7. Version control repository: SVN or GIT
  8. Statistics visualization tool: BIRT
  9. Office suite to keep the documentation: LibreOffice
These tools will help you to test fast, deliver the high quality and what is the most important you will work efficiently!